
Nelson Racing Scimitar


Scimitar GT SE4a Coupe
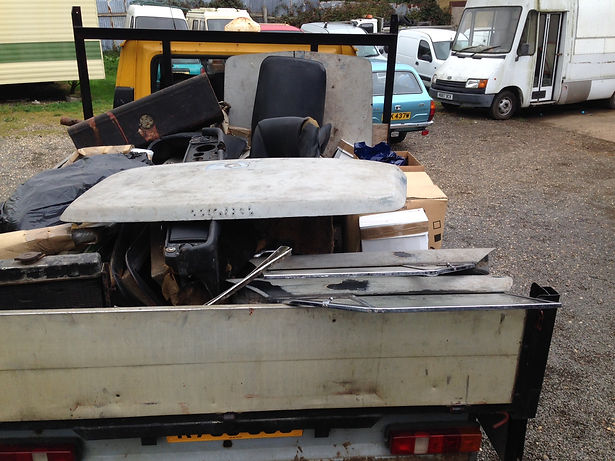
Next Project.... a road car this time.
Have always loved the 60s styling of the Coupe. So, took the plunge in September 2014 and bought a project for £726 - a rolling chassis and a pick-up truck full of parts.


ORE 239F first registered in Staffordshire (so quite possibly a Reliant registered car) more on the mysteries of this particualr car later....
First key step - getting the body off - succesfully acheived with a little muscle power.


Good news is that the chassis is in pretty good shape. The out-riggers are rusted badly but then 4 new outriggers were included in the "box of bits" that came with the car.

While the chassis was away being blasted and powder coated, a major redesign of the garage was undertaken. A "mezzanine" level was added to my 2-storey barn to get all the storage items off the working area - really pleased how this has turned out with enough space to work on 2 cars (and a bike; 2 tractors etc.) about 60 sq metres of floor space.
Looking good ! Always feels really great to start with a shiny new paint job - and peace of mind that all the hard work to come is on a sound basis.
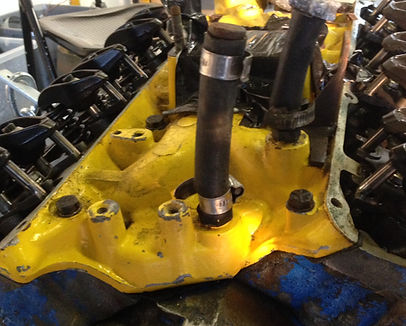
A tidy-up of the engine was also undertaken. The engine is a "SC" Scimitar block but out of the "donor" 5a Race car. So a nice fast road car engine - just need cosmetic attention - I really couldn't stick with the yellow inlet manifold......
Engine Spec.
Standard (later type) 3.0 ltr V6 Essex with standard size Ford piston in honed block. Cross-drilled crank -40 thou big ends; -50 thou mains; standard thrust bearings.
High tensile big end bolts (con-rod ends caps tapped out to suit longer bolts).
High pressure oil pump; Piper 285 cam with Piper followers (valve clearance In 0.014” / 0.35mm; Ex 0.016”/.40mm).


Ric Wood Aluminium timing gear and matched crankshaft gear.
JW Development Lead-free high efficiency heads (D-port), standard valve sizes with A/bronze inlet valve guides; JW valve springs.
Inlet manifold port flowed and matched to cylinder heads by JW Developments.
A compression test showed that two cylinders were "down". The engine had sat for quite a while so I decided to take the heads off, get them skimmed, new valve guide seals installed and new gaskets added. All "peace of mind" stuff as I am sure the compression test was a result of a couple of sticky valves but easier to sort now than later.
Block painted in Corporate Ford Blue and inlet manifold, timing cover and pulley bead-blasted. Rocker cover powder coated gloss black - very nice against the Ford Corporate Blue block. (picture to follow)
Who doesn't like nice shiny things?
A great job by Steve Usher bringing the (modified) Weber 38DGAS back to new - a quick acid bath and refurb - topped-off with a new chrome filter - very bling! Some ducting will bring cold fresh air to the filter so the carbs are not breathing hot "weak" air...
Carb. Spec. JW Developments modified DGAS 38 Carb. with 32mm chokes; jetted to suit engine tune. Mains 160; air correctors 150, Idles 60; Emulsion tube F50, Pump Jet 55.
Steve is a really interesting and skillful guy, check out his web site.
http://www.usherengineering.co.uk/
Axle and Rear Suspension - The axle has been upgraded from the original SE4a Salisbury 7HA to one that is based around the later 4HA “remanufactured” with new custom built tubes, laser-cut brackets and SE6a hubs. The SE6a Disc Brake upgrade was reused (using Rover 820 Vitesse calipers, billet aluminium caliper hangers and Green Stuff pads). The 3.54:1 crown-wheel and pinion came from a Daimler limousine and Salisbury “Power Lok” Limited Slip Differential from a Jaguar. All-in, a more robust set up to cope with the 165 bhp and Ford Type 9 x5 speed box. Simon Constable (the best axle man in Norfolk :-) worked his magic. Filled with Castrol Z Limited Slip 90 oil
Amazingly the Watts linkage fitted without any modification - a first time for everything!.
All Trailing arms blasted, powder coated and rebushed with aforementioned GAZ adjustable shocks to complete the job (200 lb rear).
However, first things first. Get a rolling chassis with wheels at each corner....
Front Suspension and brakes - is a bit of a Frankenstein. SE6a vertical link, upper & lower wishbones, with SE4 base plate and, steering tie-rods. The nice bits are a set of Superlite Wilwood Calipers and vented discs from my deceased SE6a race car. I will be adding "Yellow Stuff" pads in due course.
Everything that wears has been replaced and nice new nuts and bolts. Everything else blasted and powder coated. Steering rack (old Triumph Spitfire I think) refurbished with solid mounting blocks (from Rimmers) to add steering stability. All new red performance polybushes, TREs etc.
To top it off a set of uprated adjustable GAZ shocks (275lbs) and coils will be added when ride height is set correctly.

Engine in chassis - starting to look like a car... (note the horid yellow manifold now blasted and back to original surface).
To make the car more "liveable", sourced a 5 speed Ford "Type 9" gearbox. The one (from the 2.8 Ford Sierras , Capris etc.) that had the tougher lay-shaft bearing. With the 3.0ltr Essex engine, felt that this was safer. The Type 9 with the older (weaker) roller bearing was designed for the 2.0 ltr Fords and there were many reports of it not being up to the job.
Unfortunatley, the Essex Bell Housing is not a straight fit to the Type 9 gearbox so a fancy adapter plate was sourced and drilled etc. to make fit. Eventually (after much fitting, refitting, drilling and shaping) got a nice fit.
Also decided to convert the very crudely created cable clutch to a more "hi-tech" hydraulic clutch - sourced from Rally Design. Looks nicely made and was pretty straight forward (except had to fiddle with the fitting because of the adapter plate) - but this was an hour or two of fettling rather than really tricky stuff.


As the series of photos show - nice kit and with a custom-made plate to cover the bellhousing openning and grommets all the hydraulic pipes fit nicely.


Gearbox went in nicely - even with a new clutch fitted and all the various mods undertaken. The prop shaft was shortened significantly (about half the length / weight of the standard).
Ratios:
1st - 3.36:1
2nd - 1.81:1
3rd - 1.26:1
4th - 1:1
5th - 0.82:1
Weight 86 lbs.
Decided to fill with oil just so see if everything is oil-tight - so far so good.
Bodywork...
There was not much more I can do to the rolling chassis without putting the body on - so had to make a start on bodywork. The body had been partially stripped when I bought the car so all the horrible parts were pretty visible - no really nasty shocks (but that doesn't make the hours of labour any easier).
Some structural fibre glassing to do and a little "re-modelling" to get the car looking how I want it. Have had to cut out the lip on the rear wheel arch in order to fit the wheels I am using, however, have not gone so far as flared arches yet. This may be necessary as (seen earlier) the axle is non-standard - we will see. (... and we did - see later comments when body goes on !)
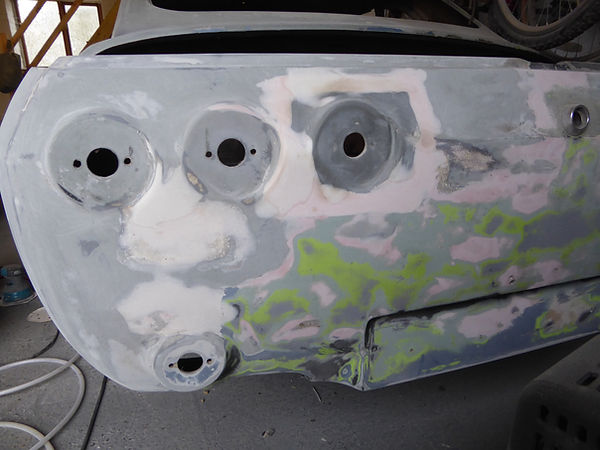
I have also made some design choices at this stage - most noticeably the rear layout. I have never really been a fan of the rear view of the Coupe. Main problems are the rectangular reflector below two really nice round rear lights; and the chrome bumper which looks like it's slipping off the back. So, I am going for a clean rear look without a bumper and a 3rd light "frenched" at the rear. So the rear will have (L to R) indicator; tail/brake; reversing; fog; tail/brake; indicator with the reflectors low down either side of the number plate. I think it will look smart and a lot cleaner than the "afterthought" design of Reliant. We will see what the reaction is when painted and shiny.

Only way to make progress is a quarter at a time. Rear near gets the treatment first..


Quite a range of colours have been exposed. The original (because it is the layer before the original primer) was a metallic blue.
On top of that was a lime green; then cream and on top of that, black. The deep red and yellow seen on the near side front wing is from a "donor" wing that has been added to a damaged corner at some stage. But it is all part of the car's history....
The front will be slightly altered also with "quarter" chrome bumpers; the front number plate raised (to where the middle of the bumper would have been) and additional ventilation added to the low front panel / vallance where the number plate was originally. My son's 3D printer will come in useful to fabricate some nice pieces to finish all that off.
Reassembly
The next step was to rejoin the body to the rolling chassis. Whilst the body was off, though, the brake lines and fuel pipes were run along the chassis rails and special oil resistant foam was stuck to the chassis tops to form a sound-deadening layer between chassis and body.
The under-side of the body was treated with "Raptor" bed-lining which forms a really hard seal to the fibreglass (far better than stone-chip paint) and produces a lovely deep black finish to the underside and inside wheel arches etc.


Replacing the body was achieved by suspending the body on a lift, positioning the chassis under the body and making fine adjustments of angle and position with means of a couple of jacks. The rear of the body needs to be "slotted" into the boot floor before lowering the front carefully in position. Success!.
In order to to continue with the mechanical work of attaching pedals, brake servo, expansion tank etc. the next job was to paint the engine bay. I can't describe the thrill of seeing some colour on the car - even if it is a place that will be unseen for 99% of the time. But I know it's there. The first "peak" of Iris Blue - the rest of the external body will be painted in one-go when all the mechanical work is complete.


As expected (but dreaded) the rear wheel arches proved to be just a little narrow when replacing the body. The non-standard axle and slightly wider wheels would only fit comfortably with wider wheel arches. I had had the foresight to buy a couple of SE5a wheel arches from a scrapped Scimitar and proceeded to graft them in place.
Cutting to shape, riveting and gluing tabs in place to hold in position then glassing them in from the inside of the arches. I had never really done any "precision" fibreglassing before, but with a little filling and sanding I am very happy with the result.....
Riding a bit high at the moment but there is still some weight to go in (Fuel Tank, Glass, Interior etc.). The adjustable shocks will allow the right set up when all is on-board.
The task of adding everything to the engine bay continues with the location of the battery. The original battery(ies) were located at the front of the engine bay so thought I would stay with that. A small aluminium platform was mounted onto rubber bushes with an Odyssey Extreme TPPL (Thin Plate Pure Lead) 35; PC925 with a 900 amps cranking current which should be ample.


So much effort had gone into the project that "spoiling it for a ha'porth of tar" just didn't seam sensible. So the paint job was sent to Matt Saint Laurent of Heacham, Norfolk Autowerk. Matt had painted and done some commissioning work on my VW Campervan and had done a great job.
The Iris Blue really shone under several clear-coat layers. Can't wait get some chrome on to provide a contrast to the strong colour.


Matt also helped with some of the finishing mechanical work; building a custom exhaust; installing the EPAS (an MGF system)


